安裝
本地軟體安裝
1. 安裝 Git
設定 Git
初次使用 Git 需設定使用者名稱和 E-mail:
git config --global user.name "John Doe"git config --global user.email "johndoe@example.com"若出現亂碼 ESC[33 和 ESC[m 可執行此指令:
git config --global core.pager "less -r"2. 終端機 - Git Bash
終端機建議使用 Git Bash (安裝 Git 即會自動安裝Git Bash)。在 Git Bash 中無法使用 Ctrl C/V 複製貼上,需要用 Ctrl Insert 複製、Shift Insert 貼上。但如果使用 Windows Terminal 的話就可以直接使用 Ctrl C/V 複製貼上。
3. 設定 SSH
生成私鑰:Generating a new SSH key and adding it to the ssh-agent
4. 安裝 VirtualBox (虛擬機)
5. 安裝 Vagrant (虛擬機管理工具)
6. 下載 Homestead
git clone https://github.com/laravel/homestead.git ~/Homesteadcd ~/Homesteadinit.bat7. 配置 Homestead
(可選) 自動複製.gitconfig到虛擬機 (配置 Vagrantfile)
(可選) 移動Vagrant Box及VirtualBox VMs到其他磁碟 (固態硬碟適用)
8. BIOS 設定
重新開機,進入 BIOS,將「Intel Virtualization Technology」(Intel 虛擬化技術) 選項開啟。
9. 啟動虛擬機
執行(Windows須使用Git-bash):
開機並更新設定:
vagrant up --provisionSSH連線、操作:
vagrant ssh關機(虛擬機使用完畢須關機,否則下次使用會出問題):
vagrant halt10. 安裝 phpMyAdmin
11. (Ubuntu) 修改Ubuntu預設編輯器
登入虛擬機,執行:
sudo update-alternatives --config editor出現以下畫面:
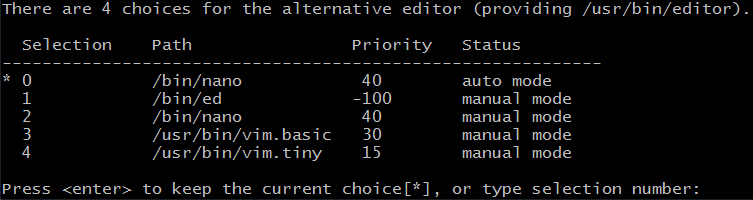
輸入 3,將會切換成Vim編輯器。
12. 配置共享資料夾
預設的資料夾為 C:\Users\[使用者]\code,若 code 資料夾不存在須創建。
mkdir ~/code && cd ~/code13. 新增 Laravel 專案
使用 Composer 下載 Laravel 安裝包:
composer global require "laravel/installer"建立新 Laravel 專案 (blog 為專案名稱):
laravel new blog修改 Homestead.yaml:
folders:  ...  - map: ~/code/blog    to: /home/vagrant/code/blog
sites:  ...  - map: blog.test    to: /home/vagrant/code/blog/public
重新啟動虛擬機:
vagrant haltvagrant up --provisionvagrant ssh14. 修改 Hosts 設定
開啟 C:\Windows\System32\drivers\etc\hosts,增加以下設定:
192.168.10.10 blog.test15. 整合 Vite
開啟 Vite Server 的 port:
如果有使用 VSCode Remote SSH 套件 的話就不用加這段,因為 Remote SSH 套件會在啟動 dev server 時自動轉發 port。
ports: - send: 5173 # for vite server to: 5173然後在 vite.config.js 加上以下設定:
import path from 'node:path'
export default defineConfig({ server: { host: true, hmr: { host: 'localhost', }, watch: { ignored: [ path.join(__dirname, 'app/**'), path.join(__dirname, 'bootstrap/**'), path.join(__dirname, 'config/**'), path.join(__dirname, 'database/**'), path.join(__dirname, 'lang/**'), path.join(__dirname, 'public/**'), path.join(__dirname, 'routes/**'), path.join(__dirname, 'storage/**'), path.join(__dirname, 'tests/**'), path.join(__dirname, 'vendor/**'), ], usePolling: true, }, },})usePolling: true 的設定會讓 CPU 使用率提高,如果要避免此問題,可以使用 VSCode 的 Remote SSH 套件 來遠端開發,只要在非 Windows 的環境編輯就不需要加上 usePolling: true 了。
建立 Vite 開發伺服器的 HTTPS 證書:
sudo /vagrant/scripts/create-certificate.sh localhostsudo chmod -R 644 /etc/ssl/certs/localhost.key設定本地開發用證書路徑:
VITE_DEV_SERVER_KEY=/etc/ssl/certs/localhost.keyVITE_DEV_SERVER_CERT=/etc/ssl/certs/localhost.crt然後就可以在 Vite 中讀取 HTTPS 證書了:
import fs from 'node:fs'import { defineConfig, loadEnv } from 'vite'
export default defineConfig(({ mode }) => {  const env = loadEnv(mode, process.cwd())
  return {    server: {      host: true,      hmr: {        host: 'localhost',      },      https: env.VITE_DEV_SERVER_KEY && env.VITE_DEV_SERVER_CERT        ? {            key: fs.readFileSync(env.VITE_DEV_SERVER_KEY),            cert: fs.readFileSync(env.VITE_DEV_SERVER_CERT),          }        : undefined,      ...    },  }})
16. ngrok 內網穿透
把 example.com 替換成需要使用的網址,如果有用 HTTPS 可以使用 443:
ngrok http example.com:80 --host-header=rewrite# 若使用 HTTPSngrok http example.com:443 --host-header=rewrite其他
錯誤訊息:「Timed out while waiting for the machine to boot」
需要關閉「容器」、「Windows 沙箱」、「虛擬機器平台」、「Windows 子系統 Linux 版」、「Hyper-V」功能,以「系統管理員」身分開啟 PowerShell 執行:
Disable-WindowsOptionalFeature -Online -FeatureName Containers,Containers-DisposableClientVM,VirtualMachinePlatform,Microsoft-Windows-Subsystem-Linux,Microsoft-Hyper-V-All若需要使用 Docker 或 WSL 的話,可以重新開啟:
Enable-WindowsOptionalFeature -Online -FeatureName Containers,Containers-DisposableClientVM,VirtualMachinePlatform,Microsoft-Windows-Subsystem-Linux,Microsoft-Hyper-V-All檢查功能是否開啟:
Get-WindowsOptionalFeature -Online -FeatureName ContainersGet-WindowsOptionalFeature -Online -FeatureName Containers-DisposableClientVMGet-WindowsOptionalFeature -Online -FeatureName VirtualMachinePlatformGet-WindowsOptionalFeature -Online -FeatureName Microsoft-Windows-Subsystem-LinuxGet-WindowsOptionalFeature -Online -FeatureName Microsoft-Hyper-V-AllHomestead 安裝問題
在本機安裝 Homestead 的安全憑證
解決 HTTPS 顯示為不安全的問題。
登入虛擬機,輸入以下指令取得憑證 (your-dir 替換成任一已存在的資料夾):
sudo cp /etc/nginx/ssl/ca.homestead.homestead.crt ~/code/your-dir# Ubuntu 20.04 的版本要執行下方的指令sudo cp /etc/ssl/certs/ca.homestead.homestead.crt ~/code/your-dir開啟檔案總管,雙擊開啟憑證,點擊 安裝憑證,憑證存放區選擇為 受信任的根憑證授權單位,之後點擊完成即可。
舊的文章可以參考:使用 HTTPS 連線 Homestead 網站 (Windows)
(Windows CMD) 設定在虛擬機中用 Composer 安裝套件時,新增 .bat 檔
Config (bin-compat) - Composer
於 Homestead 執行:
composer config -g bin-compat full增加路徑至 PATH
執行:
sudo vim ~/.profile輸入:
PATH="/home/vagrant/.yarn/bin:$PATH"執行 php artisan storage:link 時出錯 (無法新增 symlinks)
解決方法:重新開機並以 系統管理員 執行 Git bash,啟動虛擬機。完成後再執行一次 php artisan storage:link。
執行 vagrant up 時總是出錯,最終解決方法,重新下載相關檔案
刪除以下資料夾:
C:\Users\[使用者]\.vagrant.dC:\Users\[使用者]\VirtualBox VMsC:\Users\[使用者]\Homestead\.vagrant
再重新執行 vagrant up
執行 vagrant ssh 並啟動任意持續執行的程式,按 Ctrl+C 會出問題
導出 vagrant ssh 的設定檔:
sed -i '1i Include config.d/*' ~/.ssh/configmkdir ~/.ssh/config.dvagrant ssh-config --host vm > ~/.ssh/config.d/vm之後可以在啟動 vagrant 虛擬機後使用 ssh 來連接:
ssh vmVite HMR 沒反應或很慢
因為在 Linux 環境下 file descriptor 和 inotify 遇到上限時會直接沒反應,因此當遇到此問題時可以檢查看看當前的 inotify 上限數量:
sysctl fs.inotify臨時增加上限:
sudo sysctl fs.inotify.max_queued_events=16384sudo sysctl fs.inotify.max_user_instances=8192sudo sysctl fs.inotify.max_user_watches=524288sudo sysctl -p永久增加上限,執行完記得重啟:
echo fs.inotify.max_queued_events=16384 | sudo tee -a /etc/sysctl.confecho fs.inotify.max_user_instances=8192 | sudo tee -a /etc/sysctl.confecho fs.inotify.max_user_watches=524288 | sudo tee -a /etc/sysctl.confsudo sysctl -p當然也有可能是 RAM 太小,同時調高虛擬機的 RAM 可以來解決。